Making Tiles

Making Tiles
A vast majority of my RPG map bits and miniatures are hold overs from my Heroscape obsession from a few years ago. The hex tiles have enabled some fairly epic maps.


While I love the miniatures, their bases are a bit larger than the standard RPG miniature base.
 |
| Top: Heroscape Figures Bottom: Bases from WizKids Miniatures |
This is a non-issue for exterior terrain builds because the Heroscape hex tiles are properly scaled for the larger bases. It’s problematic for interior terrain builds though because the standard 1-inch squares for your typical table map are just too small.
 |
| Heroscape Hex Tile Compared with Standard RPG Map Grid |
I got around this a few years ago by making my own square map tiles properly sized to the Heroscape hex tiles.

They work great not only for Dungeons and Dragons tabletop terrains but also for the Heroscape game itself. This makes it easy to use both in a single map without much fuss.


For Session 6 of the Skyfell homebrew campaign I’m currently running, I realized I might need more square tiles. As part of the prep for that session I made some that looked like wooden floors. This post talks about how I made them.
Pouring
I use plaster to make my tiles. In hindsight this probably wasn’t the most cost effective choice but the original tile sets were some of the first DIY terrain building I’d done and I was inspired by the miniature furniture, walks, and other set pieces I had purchased through other makers.For molds, I have a pair ice cube trays I picked up a while ago that have silicone bottoms. This makes it extremely easy to pop out dried tiles. Perhaps even more importantly, the height of the silicone portion of each cube in the tray is the same as the Heroscape tiles. This makes for a very easy fill line to help maintain a consistent height as I pour each tile. (Though, my impatience has ensured uneven tiles every time. Hahaha!)
 |
| Ice Cube Trays and Plaster That's All You Need |
Pouring the tiles, then, is just a matter of mixing the plaster and filling each cube to the edge of the silicone. I then just wait for it to dry.
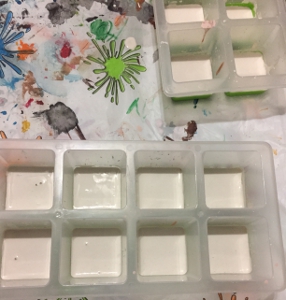 |
| Pouring the Tiles |
The result is a tile that is the perfect match for the Heroscape hexes.
 |
| Perfectly Uniform Tiles Just Out of the Molds |
Note: In a failed experiment, I mixed some acrylic paint with the plaster before pouring it. The result never really dried properly and was too chalky. I threw out those tiles. The discoloration you see on the tiles in the above image is because I was a bit lazy. I poured a second set of tiles without properly cleaning the molds. As a result, some of the residue from the failed set mixed with the second set. I was also curious to see what would happen. The second group of tiles set fine.
Shaping
For my previous tiles, I used foil placed in the bottom of each cube in the tray to mold a rock texture. For this new set of tiles, I wanted to make the tiles look like wooden planks. I toyed with the idea of layering the bottom of each cube with Popsicle sticks. It proved difficult to cut the sticks. It was also time consuming so I abandoned that idea pretty quickly.I did find a drywall knife that I had bought years ago for some home repairs. The spacing of the teeth on this knife were nearly perfect for my needs.
 |
| Drywall Knife |
So, I simply dragged the knife blade down the surface of each tile to carve the boards. I quickly discovered that the best results came when I did a primary set of lines at twice the depth of a secondary set of lines. Also, the boards felt more realistic when I gave a little curved to the lines rather than drawing them straight lines.
 |
| Carving the Grooves for Boards |
Painting
After my simple carving work, it was time to paint. I use craft paints for all my miniature work. At less than a dollar a tube at some stores, it’s a tough bargain to beat. I have no favored brand. I usually buy what’s cheapest tube for the color I need. |
| My Arsenal of Bargain Paints |
For these tiles, I started with a dark brown base coat. (I'd tell you the name, but the label is worn and I can't read it.) I made sure to fill in all the grooves and completely coat each tile.
Before this was thoroughly dry, I made a second pass using a dark brown-red color (folkart's ocre rouge). I made straight brush strokes parallel to the grooves. Because the brown undercoat was partially dry the reddish overcoat blended well enough to develop a rich color but still left some streaking the felt like wood grain.
 |
| Tiles with Dark-brown Undercoat Mixed with Ocre Rouge |
After these dried completely, I dry brushed a yellowish tan color (a mixture of of Ceramcoat's bambi brown and Ceramcoat's yellow) once again running parallel to the grooves. I also dry brushed the tile edges to bring out ridges. The combination of the blended undercoat and the tan dry brush made for a wonderful woody color and texture.
 |
| Tiles with Initial Dry Brushing |
I wasn't totally satisfied with this though. It was a bit brighter than what I wanted. (Though in hindsight, I probably could have stopped there and it would have been fine.) So, I did another dry brush of brown (craft smart's brown). This provided a richer combination of colors that calls to mind wood that is used but cared for.
 |
| Tiles with Final Dry Brushing |
The last step was to seal the tiles with Mod Podge. Because they are plaster, even the act of storing the tiles can be rough on the paint. Mod Podge provides a little extra protection against damage.
 |
| Coating the Tiles with Mod Podge |
After the Mod Podge dried, the tiles were ready for play.
Playing
I used the tiles in my Session 6 a few days later. I built the temple of Wildwanderer with them. |
| Using the Tiles in Game: Temple |
I also built out the barracks where the characters took a long rest.
 |
| Using the Tiles in Game: Barracks |
All in all, I’m fairly pleased with these tiles. I might make another set with a lighter color for old or rotting wood. I still have a lot of plaster left.
In a future post, I'm going to write about how I create hex bases for some plaster trees I used. It should be fun.
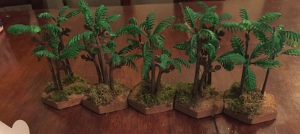 |
| Home-crafted Tree Bases that Fit Heroscape Hexes |
Until then, check out my other posts and keep up to date on the sessions in the Skyfell campaign.
--------------------------------------------------------------------------------------
Follow me on one of these fine social media platforms:
Instagram: @hokumsean
Spotify: @hokumsean
Twitch: @hokumsean
Twitter: @hokumsean
Tumblr @hokumsean
Stop by my YouTube channel "Ovens and Dragons" and partake in the exciting world of cooking for gamers.
Also, check out my DMsGuild offerings:
- Epic Gnomish Inventing
Rules supplement for creating gadgets. - Gnome Concept Packages 1
Collection of gnome-related backgrounds, feats, magic items, and more. - Great House Servants
Collection of backgrounds centered on the servants of a great house. - Mildew's Revenge
A first-level adventure. - Random Plot Generator
A tool for creating adventure prompts for one-shots and story arcs. - The WhatNot Shop’s Absurd Accoutrements
A collection of unusual magical items. - The WhatNot Shop's Bracing Beverages
A collection of strange potions. - The WhatNot Shop's Common Curiosities and Trivial Trinkets
A collection of common magic items and trinkets. - The WhatNot Shop's Dastardly Doodads and Orc Oddities
A collection of orc-themed common magic items and trinkets.

Comments
Post a Comment