Making Doors
Making Doors
I have been a fan of HeroQuest since it was first released way back in 1990. (And I am super excited about the re-release from Hasbro Pulse.) Aside from its simple-but-effective combat mechanic, its intriguing miniatures, interesting quests, and ability to use the same character (and treasures) from one session to another, the board came with a wonderful collection of set pieces that were a combination of plastic and cardboard. It was also the closest thing to Dungeons and Dragons that I could get folks to play (as described in an earlier post of mine).
I've played HeroQuest off and on over the years. Since diving deep into Dungeons and Dragons 5e, I've been using the set pieces in my campaigns. One of the more convenient pieces are the doors. The base game comes with several "closed" doors and several "open" doors. I've been using them heavily in my campaign.
 |
| Using Heroquest Set Pieces in My D&D Campaign |
 |
| Using Heroquest Set Pieces in My D&D Campaign |
Of course, these set pieces are now 30 years old. Some are really starting to show their age. My love for the pieces overrides my desire to use them in my games. But I do love the way the doors are made, especially with the gray plastic base. So, I decided to make some of my own doors. This post describes how I went about doing this.
My plan was to create a few closed doors that would fit into the plastic mounts from the Heroquest. The first step, then, was to create the door shapes which I did by simply tracing a door from the game repeatedly on a piece of cardboard I salvaged from a shipping box. I then cut out and trimmed these so that they were the correct size and shape.
 |
| Cutting Out the Doors |
 |
| Finalizing the Door Shapes |
Next, I painted the cardboard cutouts. I started with a basecoat of Ceramcoat Burnt Umber and while the paint was still wet I brushed in spots of FolkArt Barnyard Red. This provided some depth and variation to the basecoat. I then dry-brushed a little FolkArt Sunny Yellow and Apple Barrel Granite Gray for aging and texture. Finally, I used a fine-point, black Sharpie to draw in lines to represent the boards.
 |
| Doors Painted |
With the cardboard painted, it was time to add the final details. I wanted each door to have a handle and a pair of metal supports. For the handles, I picked up a packet of decorating beads from Dollar Tree and glued one to each side of each door. For the metal bars, I used wooden coffee stirrers. These I cut to the correct length, applied a thin basecoat of Apple Barrel Christmas Green, and then covered that with Folk Art Sterling Silver.
 |
| Doors with Handles and Beams |
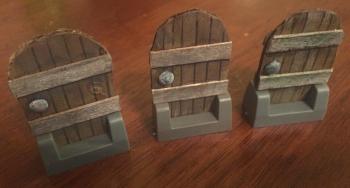
The result wasn't half bad but the handles just stood out too much for my taste and I wanted a little more shadowing. So, next, I painted each handle using Apple Barrel Granite Gray. I then did a combination of a wash and dry-brushing with Craft Smart Black. Also, it should be no surprise that the stirrers stuck out a little from the edges of the cardboard; my imprecise cutting meant that the length of the stirrers didn't match exactly the width of each door. I used an emery board to sand these down so that they were flush with the cardboard. This left me with a set of fairly decent-looking doors that had taken very little effort to make.
 |
| Doors Completed and Ready for Play |
That's it for this DIY post. I hope you enjoyed it. And while you're at it, take a look at these others if you're interested:
Making a Mimic Trinket Box
Making Trees
Making Tiles
Making a Dice Jail
--------------------------------------------------------------------------------------
Follow me on one of these fine social media platforms:
Instagram: @hokumsean
Spotify: @hokumsean
Twitch: @hokumsean
Twitter: @hokumsean
Tumblr @hokumsean
Stop by my YouTube channel "Ovens and Dragons" and partake in the exciting world of cooking for gamers.
Also, check out my DMsGuild offerings:
- Epic Gnomish Inventing
Rules supplement for creating gadgets. - Gnome Concept Packages 1
Collection of gnome-related backgrounds, feats, magic items, and more. - Great House Servants
Collection of backgrounds centered on the servants of a great house. - Mildew's Revenge
A first-level adventure. - Random Plot Generator
A tool for creating adventure prompts for one-shots and story arcs. - The WhatNot Shop’s Absurd Accoutrements
A collection of unusual magical items. - The WhatNot Shop's Bracing Beverages
A collection of strange potions. - The WhatNot Shop's Common Curiosities and Trivial Trinkets
A collection of common magic items and trinkets. - The WhatNot Shop's Dastardly Doodads and Orc Oddities
A collection of orc-themed common magic items and trinkets.


Comments
Post a Comment